More work on the base


Ok, there has been more work on the figures, but I am going to refrain from posting, so the happy couple and their friends don't spoil the surprise!
Having said that, here is how I have worked on the base so far.
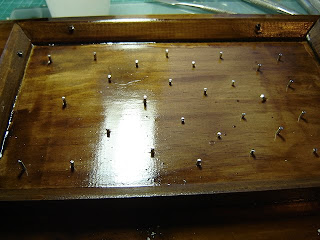
I made the decision to varnish the entire base, including the area that was going to be covered with the groundwork.
True, nice shiny varnish was never going to see the light of day ever again, the varnish will add a protective layer, so moisture from the plaster doesn't seep into the pine board, and warp it.
I followed this by hammering nails into the base, so the groundwor material will have something to grip. Another way of doing this is to score the base up with a knife in a cross hatch pattern, but doing that here would defeat the purpose of the varnish.
Then I worked on my groundwork materials.
Next pic is one of the materials used....here, I have mixed all my dry materials together. Just plain old plaster of paris, with some stones and gritswept up from the end of the dirveway, as well as sourced from the neighborhood when walking faithful hound.
Followed by the wet mix. Plain water, with a lot of acrylic paint mixed in. Mostly dark earth, with some black added in. A bit too much black, and next time, I'd go for a lighter shade of ground, say Burnt Umber, for example.
I add the paint to the water, so I get the plaster of Paris tinted at the same time I mix in the water. This avoids the horrors of bright white plaster showing through the groundwork when the finished piece s set out for display......
because if the viewing public find one glaring error, they will start looking for others.....(insert smack forehead action here)
Mix together according to directions, I prefer it to be about the consistency of cake icing, or pancake batter. This enough to flow, thick enough to be pushed about by artists palette knives.
Then I added some texture to the ground, in this case, a pair of wheel ruts, formed by tapping a spare tyre from one of the motorcycle kits along the ground.
I followed this up by adding a thin layer of very fine grit, just to add visual texture, and locked it into place by covering it with a layer of Woodland Scenic Cement, which is like watery PVA glue, except dries nice and flat!
Set aside to dry, and the final photo shows it in it's raw state. Needs to be airbrushed, with some other details yet to be added, but is already far more intersting then a plain old polished piece of board.......
back to it now!


Comments
Post a Comment